dockd Documentation
When moving from Windows to Linux on a lightweight desktop environment like Xfce or LXDE, using the dock is really hard. Usually nothing happens when you insert the dock, and you use xrandr to configure your displays. Then, you remove the ThinkPad from the dock and the screen stays blank.
That’s why we created dockd, a program that runs in the background and detects when your ThinkPad is added or removed from a dock and it automatically switches output mode profiles that you have configured before.
Latest version: 1.21
Developer: Ognjen Galić smclt30p@gmail.com
Upstream releases
git repository
Table of Contents
- Do you need dockd?
- How does dockd work?
- How to install dockd?
- How to use dockd?
- What if I change the monitor I used to configure the dock?
- Dock and undock hooks
- Changelog
Do you need dockd?
A few people have reported bugs with dockd whilst using their custom solution for dock switching. If your ThinkPad switches output modes automatically (KDE does this) you do not need dockd. If you use some desktop that does not support output mode switching (like Xfce or LXDE) or you use some lightweight window manager with barely any features (like i3 or awesome), but you have some script that you made that handles dock switching using udev and xrandr you do not need dockd.
If you wish to switch to dockd or test dockd, please disable those scripts before running dockd, because dockd and those scripts are known to conflict each other.
However, if you dock your ThinkPad into the dock and nothing happens, you do need dockd.
How does dockd work?
Dockd works on the principle of output mode profiles. You define 2 profiles for monitor layouts and output modes and save them to disk. Then, when the dockd ACPI system detects that the ThinkPad has been docked or undocked, it reads those output mode profiles from disk and applies them.
Here’s a video how this works:
How to install dockd?
If you run a newer version of Ubuntu than Xenial Xerus, there are Ubuntu repositories avaialble here on ThinkPads.org. If you are using Arch Linux, there are packages in the AUR.
If you run neither of those, you need to build libthinkpad and dockd from source.
libthinkpad needs systemd >=221, so any system running systemd earlier than 221 is not supported currently. However, that will change in the future as the depenency on systemd is no strong.
Here’s how to build dockd from source:
1) Build libthinkpad from source and install it
2) Install the development dependencies
Dockd depends on libXrandr and libthinkpad.
To build dockd you need the X11 RandR extension API installed and ready for development, which means that you need to install your distributions development package for it.
Here’s the package name for popular distributions:
Debian: libXrandr-dev
Fedora: libxrandr-devel
Gentoo: libXrandr
openSUSE: libXrandr-devel
If your distribution’s package manager supports file search (aka. provides), search for X11/extensions/Xrandr.h
NOTE: Watch out for that capital ‘X’ on some distributions.
Install that package with your distribution’s package management system.
3) Install the build system dependencies
Note: If you built libthinkpad yourself you can skip this step.
dockd uses CMake as it’s build system, so we need to install that. Version >=2.8 is needed, and most distributions provide versions greater than that. The package is usually called cmake. Install it, and verify that CMake version >=2.8 is operational by running cmake --version:
thinkpad :: ~ » cmake --version
cmake version 3.7.2

CMake suite maintained and supported by Kitware (kitware.com/cmake).
Next, we need a compiler suite that is C++11 compilant. dockd was developed and tested with the GNU Compiler Collection, version 5.4.0 on Ubuntu Xenial Xerus. The package has very different names for different systems, here are the most popular ones:
Ubuntu: build-essential
Debian: build-essential
Fedora: gcc-c++
openSUSE: gcc-c++
After installing the GNU C++ Compiler, verify that it works by running g++ --version:
thinkpad :: ~ » g++ --version
g++ (Ubuntu 5.4.0-6ubuntu1~16.04.5) 5.4.0 20160609
Copyright (C) 2015 Free Software Foundation, Inc.
This is free software; see the source for copying conditions.  There is NO
warranty; not even for MERCHANTABILITY or FITNESS FOR A PARTICULAR PURPOSE.
Next, we need a Makefile-compatible runner. We will use GNU Make. The package is called make on almost all distributions, so install that. After installing, please verify that GNU Make is operational by running make --version:
thinkpad :: ~ » make --version
GNU Make 4.1
Built for x86_64-pc-linux-gnu
Copyright (C) 1988-2014 Free Software Foundation, Inc.
License GPLv3+: GNU GPL version 3 or later <http://gnu.org/licenses/gpl.html>
This is free software: you are free to change and redistribute it.
There is NO WARRANTY, to the extent permitted by law.
Your build environment is now ready.
4) Obtain the source code
Head over to our FTP archive and download the latest .tar.gz file from there.
- Extract the tarball:
tar -xf dockd-x.xx.tar.gz. - Change directory to the extracted files:
cd dockd-x.xx.tar.gz - Verify you are in the source tree:
thinkpad :: ~/Downloads/dockd-1.20 » ls -la
total 52
drwxrwxr-x 2 gala gala  4096 Nov 19 17:25 .
drwxr-xr-x 4 gala gala 12288 Nov 19 17:25 ..
-rw-rw-r-- 1 gala gala   776 Nov 17 17:50 CMakeLists.txt
-rw-rw-r-- 1 gala gala 14110 Nov 15 22:40 crtc.cpp
-rw-rw-r-- 1 gala gala  1433 Nov 15 21:43 crtc.h
-rw-r--r-- 1 gala gala   204 Nov 17 17:15 dockd.desktop
-rw-rw-r-- 1 gala gala  5130 Nov 16 15:27 main.cpp
- Run
cmake . -DCMAKE_INSTALL_PREFIX=/usr
thinkpad :: ~/Downloads/dockd-1.20 » cmake . -DCMAKE_INSTALL_PREFIX=/usr
-- The C compiler identification is GNU 5.4.0
-- The CXX compiler identification is GNU 5.4.0
-- Check for working C compiler: /usr/bin/cc
-- Check for working C compiler: /usr/bin/cc -- works
-- Detecting C compiler ABI info
-- Detecting C compiler ABI info - done
-- Detecting C compile features
-- Detecting C compile features - done
-- Check for working CXX compiler: /usr/bin/c++
-- Check for working CXX compiler: /usr/bin/c++ -- works
-- Detecting CXX compiler ABI info
-- Detecting CXX compiler ABI info - done
-- Detecting CXX compile features
-- Detecting CXX compile features - done
-- Configuring done
-- Generating done
-- Build files have been written to: /home/gala/Downloads/dockd-1.20
- Run
make
thinkpad :: ~/Downloads/dockd-1.20 » make
[ 33%] Building CXX object CMakeFiles/dockd.dir/main.cpp.o
[ 66%] Building CXX object CMakeFiles/dockd.dir/crtc.cpp.o
[100%] Linking CXX executable dockd
[100%] Built target dockd
- Run
sudo make install
thinkpad :: ~/Downloads/dockd-1.20 » sudo make install
[100%] Built target dockd
Install the project...
-- Install configuration: ""
-- Installing: /usr/bin/dockd
-- Installing: /etc/xdg/autostart/dockd.desktop
- Verify that dockd is operational by running
dockd
thinkpad :: ~/Downloads/dockd-1.20 » dockd
dockd 1.20 (libthinkpad 2.3)
Copyright (C) 2017 The Thinkpads.org Team
License: FreeBSD License (BSD 2-Clause) <https://www.freebsd.org/copyright/freebsd-license.html>.
This is free software: you are free to change and redistribute it.
There is NO WARRANTY, to the extent permitted by law.


Written by Ognjen Galic
See --help for more information
5) Install acpid
In order for dockd to support docks such as the MiniDock Series 3, you need
acpid to support it.
6) Create the needed directories
sudo mkdir /etc/dockd
7) Dockd is now installed
How to use dockd?
Please, before going further verify that nothing interacts with the dock from your desktop and read Do you need dockd?.
Dockd has two configuration files in /etc/dockd/ that need to be written. First, we write the configuration when the ThinkPad is docked.
- Insert your ThinkPad into the dock
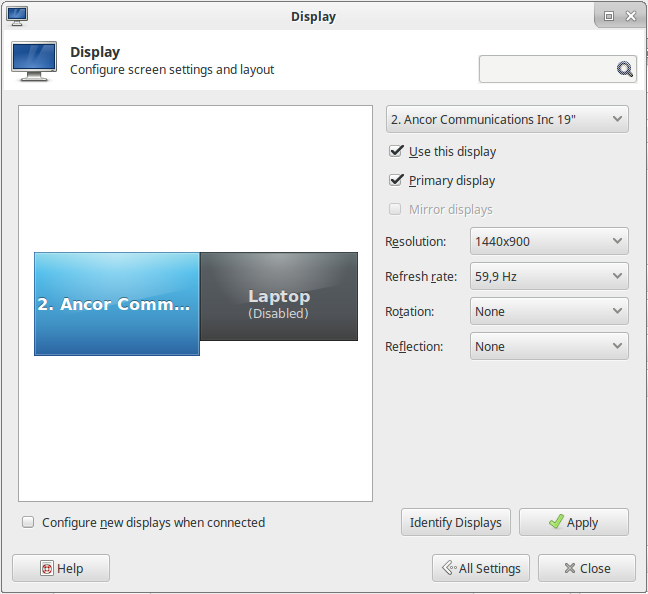
- Configure the display layouts and resolutions using your desktop environments interface (or
xrandrif you use something like i3)
Here is an example of one external monitor on a ThinkPad X220 and a Ultrabase Series 3.

- Run
sudo dockd --config docked
thinkpad :: ~/Downloads/dockd-1.20 » sudo dockd --config docked
config file written to /etc/dockd/docked.conf
The configuration when docked is now written.
- Remove the ThinkPad from the dockd
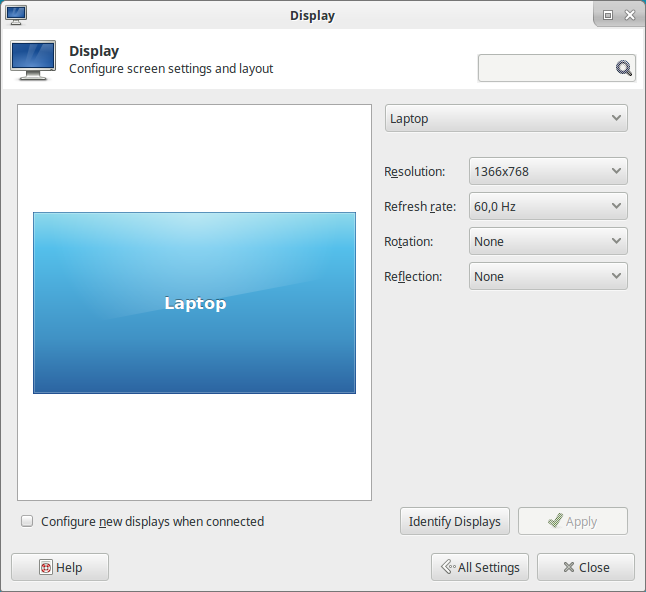
- Configure the internal panel resolution and refresh rate
Here is an example of a Lenovo X220 internal panel running at it’s native resolution of 1366x768:

- Run
sudo dockd --config undocked
thinkpad :: ~/Downloads/dockd-1.20 » sudo dockd --config undocked
config file written to /etc/dockd/undocked.conf
All config files are now written and dockd is ready for usage.
Now, just log out and log back in, and verify that dockd is running in the background by running ps -ux | grep dockd
thinkpad :: ~/Downloads/dockd-1.20 » ps -ux | grep dockd                                                                                          1 ↵
gala      5831  0.0  0.0 287768  5184 ?        Sl   08:58   0:00 dockd --daemon
If you see dockd --daemon congradulations! Dockd is now ready! Try inserting your laptop into the dock and observe if the video modes change.
What if I change the monitor I used to configure the dock?
Each time you change the external monitor configuration that you use with your dock, you need to re-run the docked configuration.
- Remove your ThinkPad from the dock
- Kill the background dockd proces:
killall dockd - Insert your ThinkPad into the dockd
- Connect the new displays to the dock
- Configure the display layouts and resolutions using your desktop environments interface (or
xrandrif you use something like i3)
Here is an example of one external monitor on a ThinkPad X220 and a Ultrabase Series 3.

- Run
sudo dockd --config docked
thinkpad :: ~/Downloads/dockd-1.20 » sudo dockd --config docked
config file written to /etc/dockd/docked.conf
Now, log out and log back in and everything should work normally.
Dock and undock hooks
If you want to to additional actions after docking or undocking,
you can define them in /etc/dockd/dock.hook and /etc/dockd/undock.hook.
There, you can disable WiFi when docked, change input profiles, keyboard
layouts, sound outputs and so on.
Changelog
What’s new in version 1.20
- First public releae
What’s new in version 1.21
- Added support for dock and undock hooks
Latest from the blog
How to add a 3.5mm Audio Jack to a Xbox 360
03 June 2018, Sunday
This is a guide on how to add a analog audio output to a Xbox 360 (Jasper) »
Disabling Spectre and Meltdown mitigation on Linux 4.1X
02 April 2018, Monday
How to mitigate the mitigation for Spectre and Meltdown »

